
What is JMRI ?
You may have heard of a DCC application called JMRI, but not know much else. Well, JMRI stands for the Java Model Railway Interface, and it is a free Digital Command Control suite of applications to allow you to control your railway from your PC, Mac, or Linux box.
It sits between your computer and your command station (your DCC controller), and passes your instructions to your command station to implement. Why should you use it ? Well, command stations are not always easy to use, especially in a complex layout ! And sometimes, you just want something simple without having to go through many button presses. The three main applications JMRI has are : Decoder Pro (an easy way to program your DCC decoders); Panel Pro (a design and operations area for control panels); and Operations Pro (creates manifests for the work a particular train will do). You don’t have to use everything; personally, I only use Decoder Pro. You can learn all about JMRI at their website. At the time of writing, the current version is 4.0.1 Production; you can also get great support from the developers via the Yahoo group.
What is a Raspberry Pi ?
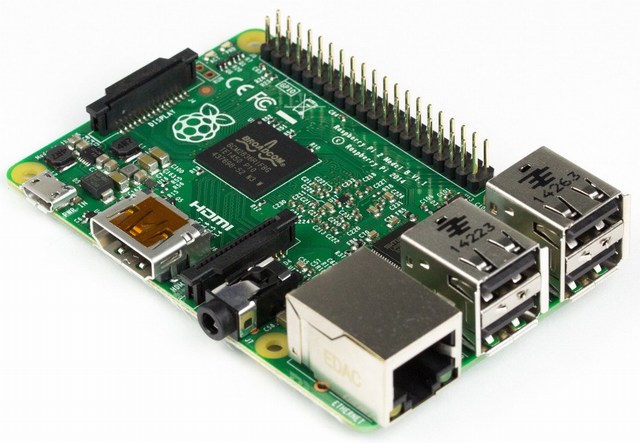
A Raspberry Pi isn’t some fruity dessert; instead, it is a proper Linux computer that is the size of a credit card – that’s right, a full computer that can sit in the palm of your hand. The price of a basic unit is only around £25, and you will also need an SD card for the operating system to install on. Several versions have been released; the latest (and the one I recommend you get) is a Raspberry Pi 2 – but if you have an older model, it will still work for this project, just not as quickly.

Plug in a USB mouse and keyboard, connect to a monitor, power up and off you go ! As mentioned, it uses Linux and the recommended distribution is referred to as Raspbian. The latest version is based on the version of Debian Linux known as “Jessie” (named after the cowgirl in Toy Story; the previous release was Wheezy, the penguin in the film; and before that was Squeezy, the LGM !). Now … Wheezy has been around for a while and has the wrinkles ironed out, whereas Jessie was released on the 29th September and people are finding some parts don’t work quite as expected. I’ll note the differences between using these when we get to them.
What is a Sprog ?
One thing it isn’t is a young child ! No, a Sprog is a Digital Command Control command station – similar in function to those sold by Bachmann, Hornby, Digitrax, etc. The difference here is that this one is the size of a matchbox, and has no external user interface – it’s designed for use via a computer. There are several versions; the original Sprog is no longer available (it was a kit from MERG), but the Sprog II and Sprog 3 are.
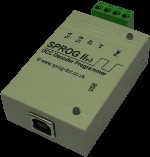
The main difference between the II and the 3 is that the II will put out 1 Amp to your railway while the 3 will put out 2.5 Amps.
Equipment Required
So – all this sounds interesting, but what you do need to get going ?
First of all – a Raspberry Pi (or RasPi, as they are known). You can use a Model B, a Model B+ or a Pi 2 – I recommend the Pi 2 as this has a quad-core processor and is a lot faster than the earlier models. To power this, you will need a microUSB power supply (a phone charger will do as long as it’s at least 1 Amp). Then a USB keyboard and mouse (you likely will have this on the computer you’re currently using). An HDMI screen is next (although if you have an older screen you can get a VGA-HDMI converter – also useful if you want to swap between your computer display and the RasPi). An SD card is also required – different RasPis use different SD cards (the original RasPis use a large card, the later ones use a microSD card); my recommendation is you buy a microSD card that has the adapter with it - this way, you can use it in either type of RasPi. Lastly, you will need an Ethernet connection to your router for internet access – a USB WiFi dongle is ideal.
For the Sprog, you will need either a Sprog II or a Sprog 3. This requires a suitable power supply (you can buy one at the same time as the Sprog – this way you know it will work with it), and you will also need a USB cable (one end to be a standard A plug to connect to your computer, the other end to be a B plug (the square type) to connect to the Sprog).
Lastly, you need software … Download Raspbian from the Raspberry Pi website (I’m using Wheezy, as Jessie is still too new at the time of writing for all utilities to work), and the current version of JMRI from the JMRI website and you’re almost there … You will also require a utility called SD Formatter to format your SD card (Windows & Mac), and having another utility called Win 32 Disk Imager may help too … Two more utilities are good to have, as they will help you control the RasPi remotely – these are Putty and TightVNC. I use a PC, so the non-RasPi instructions assume this; however Macs and Linux systems can also be used.
Building the RasPi
OK, you have all the parts and are raring to go … great ! Now, there are lots of guides on building & configuring a RasPi; but hopefully this one will bring all the information together so you end up with a working JMRI RasPi.
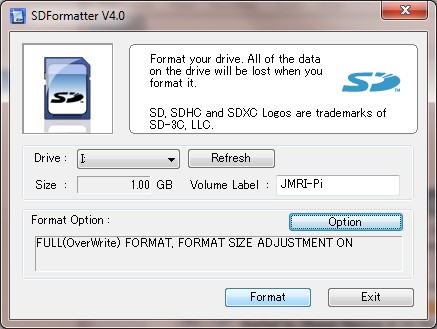
First, connect your SD card to your current computer. Run the SD Formatter utility, select the drive letter the SD card is using, change the options to “Full (Overwrite)” and “ON”, click OK, (change the volume label as well if you wish – I call mine “JMRI-Pi”) and click Format.
When finished (it takes quite a while – the larger the SD card, the longer it takes), browse to where you stored the Raspian file, and extract it to your local disk. Now copy all the extracted files onto the SD card. Once copied across, put the SD card into the RasPi. Connect your HDMI cable, keyboard, mouse, and WiFi adapter to the RasPi as well, and power it up.
After a few moments, the RasPi will display the boot screen; the NOOBS (New Out Of the Box Software) menu will ask you what version to install. Select Raspbian and click Install, and either watch the screen changes, or go make a cup of tea or coffee … this will take a while !
Once it completes, click OK to reboot and now you need to do some base configuration.
On reboot, the system will load up & put you into the configuration tool. There are a number of things to check / change :
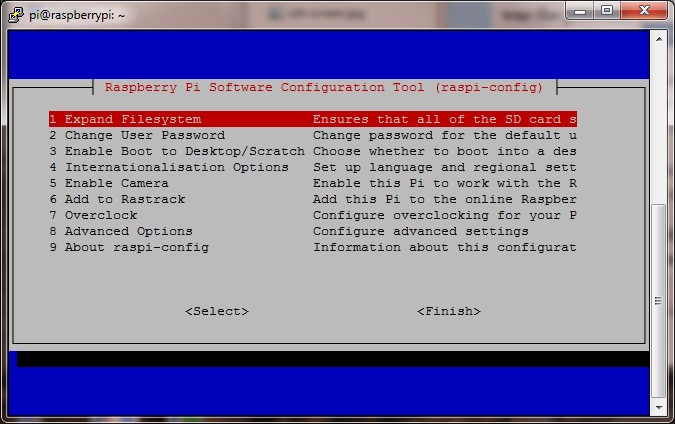
· Expand Filesystem - Select this; if it works, it expands the area to fill your SD card; if it doesn’t, it’s already set to the maximum size (this is the default on the current NOOBS release)
· Change User Password - Select this if you don’t want to use the default password
· Enable boot to Desktop - Select this if you want to automatically load the desktop
· Advanced Options
o Hostname - Select this to change to an appropriate hostname for your system
o SSH - This enables the Secure Shell – make sure you select it !
o Update - If you are internet-connected, this will ensure you are using the most recent version of this utility, as seen below
Once you’ve done your choices, select Finish. To make sure your choices are enabled, if the system doesn’t automatically reboot type “sudo reboot” and wait for the system to come back; then log-in to it again (you did remember to make note of the default user & password … ? If not, it’s “pi” and “raspberry”).
· Type “sudo raspi-config” and press Return (this loads the previous menu system)
· Go to Advanced à Update; this will update the menu system if available
OK … now to get you on the WiFi network (you can ignore this if using an ethernet cable).
· If you didn’t tell the system to load the desktop automatically, type “startx”
· On the top-right, you will have the icon of a couple of computers connected together – this is the WiFi Network icon.
o Click the icon
o Choose your network
o Type in your network password
· Now you should see the icon change to the familiar curved bars
You may want to set your router’s DHCP settings so that you always get the same IP address for the RasPi; while not essential, it is recommended as otherwise you’ll risk having a new address every time you want to use it. Please refer to your router’s instructions for this. To see what your current address is, type the following in an LXTerminal session : “hostname –I” (that’s a capital i).
Once connected to the local network, we need to update the OS.
· Type “sudo apt-get update” and press Return (this will look for updates to the OS, and prompt you for installation)
· Type “sudo apt-get upgrade” and press Return (this will look for upgrades, and prompt you for installation)
· Type “sudo reboot” to restart with the patches
Right – now you’re up to date !
Once the system has been updated, we can configure some parts to be easier to use. One of those is to allow a “remote session” on the RasPi, to allow you to load it “headerless” and control it from your computer. To do this, we need some more software … Earlier, you enabled SSH – now we get close to using it.
· Download the putty.exe file, and save it to your PC in a known location
· Double-click it, and you will get the Configuration screen
· Type in the IP address of your RasPi, and click Open
· Assuming you have the right address, you should get a terminal window open, and prompt you for a username; enter the name “pi” and press Return; type in your password at the next prompt
You now have remote access into your RasPi’s console ! But … wouldn’t it be nicer if you could see the desktop screen remotely ? Well … you can with a little more work, using TightVNC.
· At your new console prompt, type “sudo apt-get install tightvncserver” and press Return, remembering to say “yes” at the install prompt
· Once installed, type “tightvncserver” and press Return. You will be prompted for a VNC password, so type one in, press Return, type it in again to verify and press Return again.
· When asked for a view-only password, type “n” and press Return
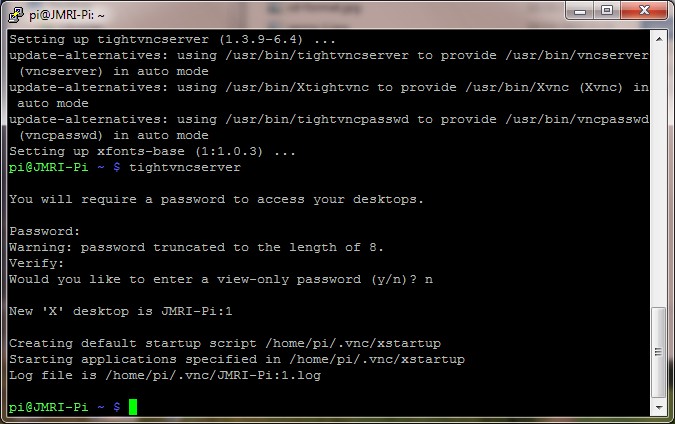
· Now, to start the remote desktop, type “vncserver :1” and press Return (it may tell you that it has already started)
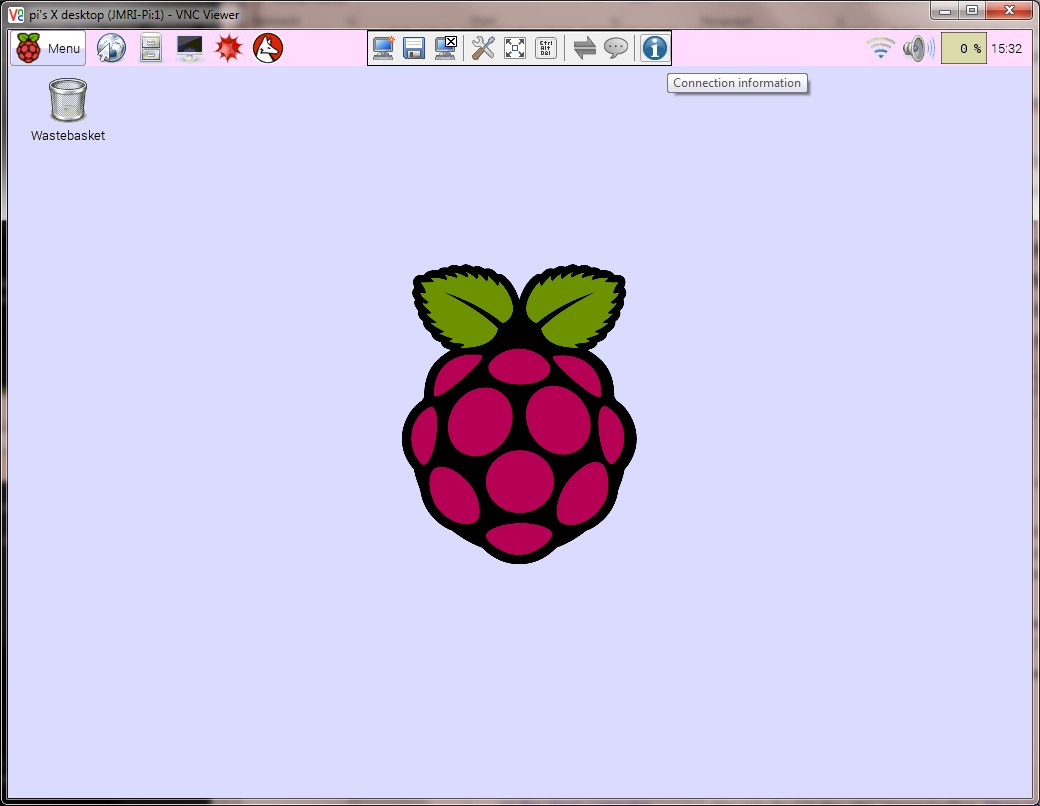
· On your computer, install the VNC software, and run it. At the VNC Server prompt, type in your IP address followed by a “:1” and press Return. You should be prompted for your VNC password; type it in, press Return and you should get your RasPi desktop open up
Now, that’s great : except, you have to load the VNC server every time … so, let’s automate it so it loads every time the RasPi is started.
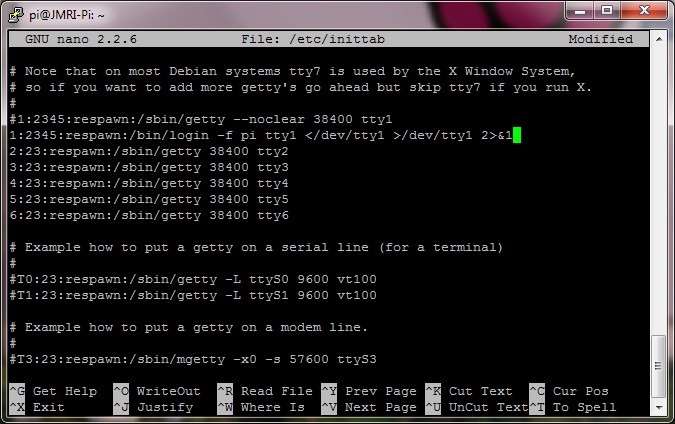
· Back at the console prompt, type “sudo nano /etc/inittab” and press Return
· Scroll down to the line “1:2345:respawn:/sbin/getty 115200 tty1” and put a hash # in front of it
· Type “1:2345:respawn:/bin/login -f pi tty1 </dev/tty1 >/dev/tty1 2>&1”, CTRL-X, Y and Return to save the file
· Type “cd /home/pi” and press Return
· Type “cd .config” and press Return
· Type “mkdir autostart” and press Return
· Type “cd autostart” and press Return
· Type “nano tightvnc.desktop” and press Return – this will open a file editor
· Type the following 5 lines :
[Desktop Entry]
Type=Application
Name=TightVNC
Exec=vncserver :1
StartupNotify=false
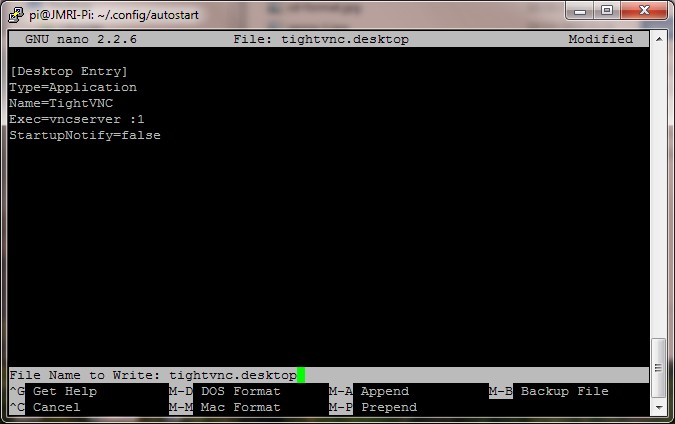
· Now press CTRL-X, Y, and press Return; the file will have saved
· Type “sudo reboot” and press Return
· When the RasPi has restarted, connect to the VNC from your PC again
Now, you may see a strange error complaining about the “GDBus.Error:org.freedesktop.PolicyKit1”.
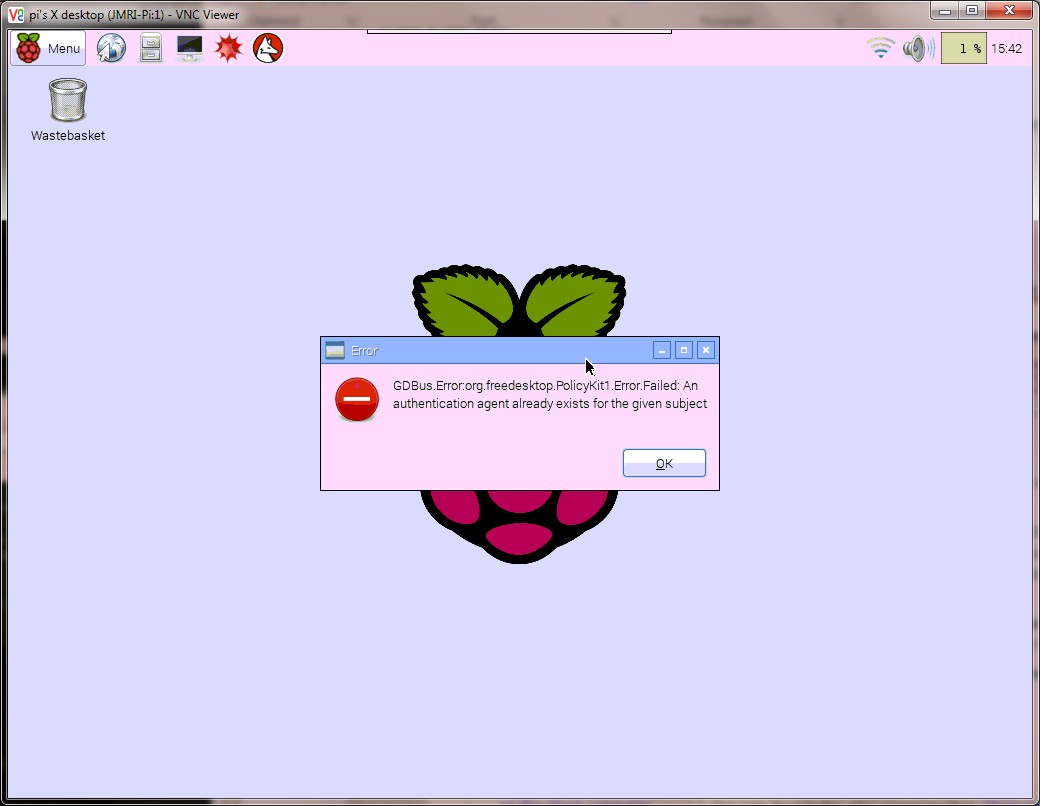
This is easily remedied by the following :
· Click ‘OK’ on the message box
· Click the LXTerminal icon to open a console
· Type “lxsession-edit” and press Return
· The Desktop Settings window opens; remove the tick for LXPolKit, and click OK
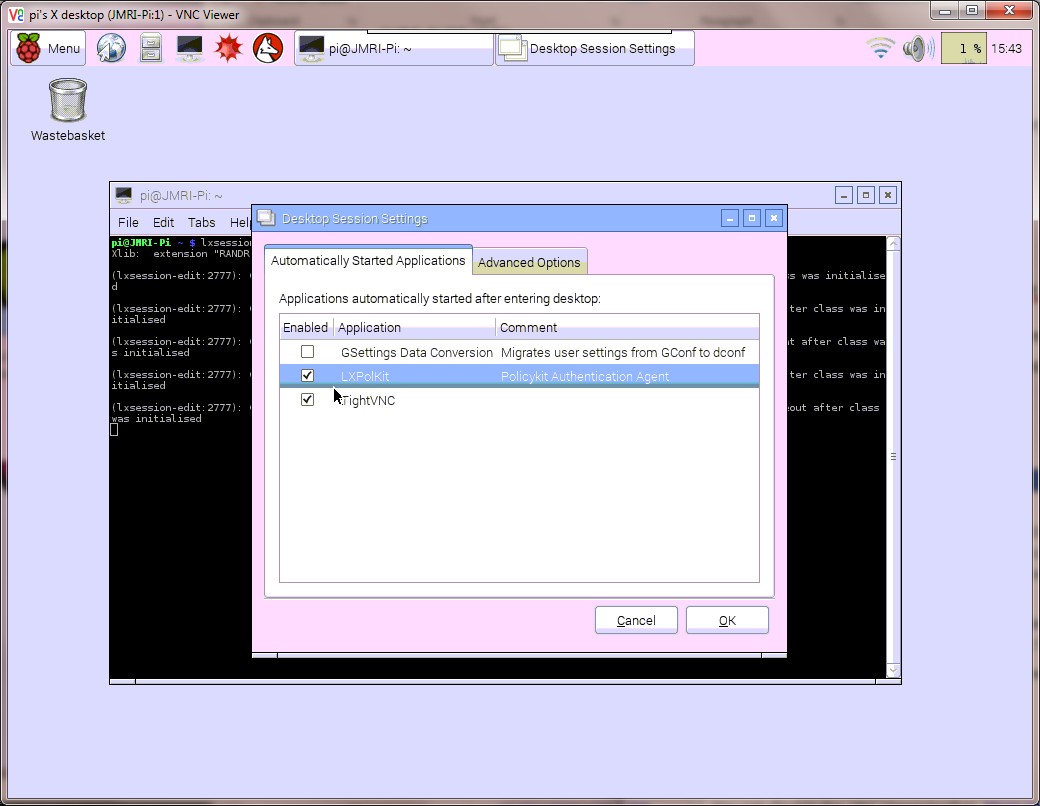
The message box will now not appear on future VNC connections. Now might be a good time to make a backup-image, so you can always go back to it if things get messed up (refer to the Backup section for details).
Installing JMRI
OK … so you have a working RasPi, and have configured it for remote access. So far, so good, but now it’s time to install the JMRI program.
First things first – the J in JMRI stands for Java; and that’s what we need to make sure is installed.
· Open an LXTerminal session
· Type “java –version” and press Return – you are wanting to see a Java version of at least 1.8.0; if you don’t have at least this version (you should !), you will need to install the current version
· Once installed, type “sudo wget https://sourceforge.net/projects/jmri/files/production%20files/JMRI.4.0.1-r29956.tgz” and press Return. The JMRI archive will start downloading
· Type “sudo tar –zxvh JMRI.4.0.1-r29956.tgz” and press Return; the archive will now decompress.
· Once decompressed, to recover the space taken by the archive type “sudo rm JMRI.4.0.1-r29956.tgz” and press Return - or open the File Manager, select the file, and delete it
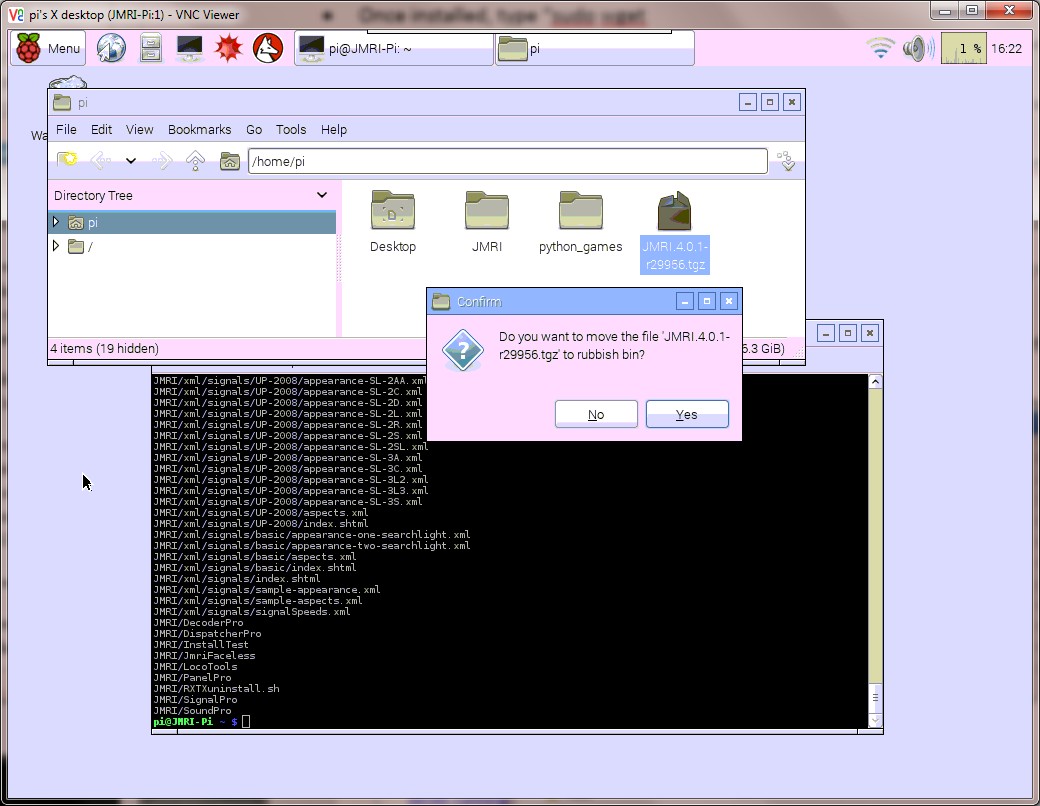
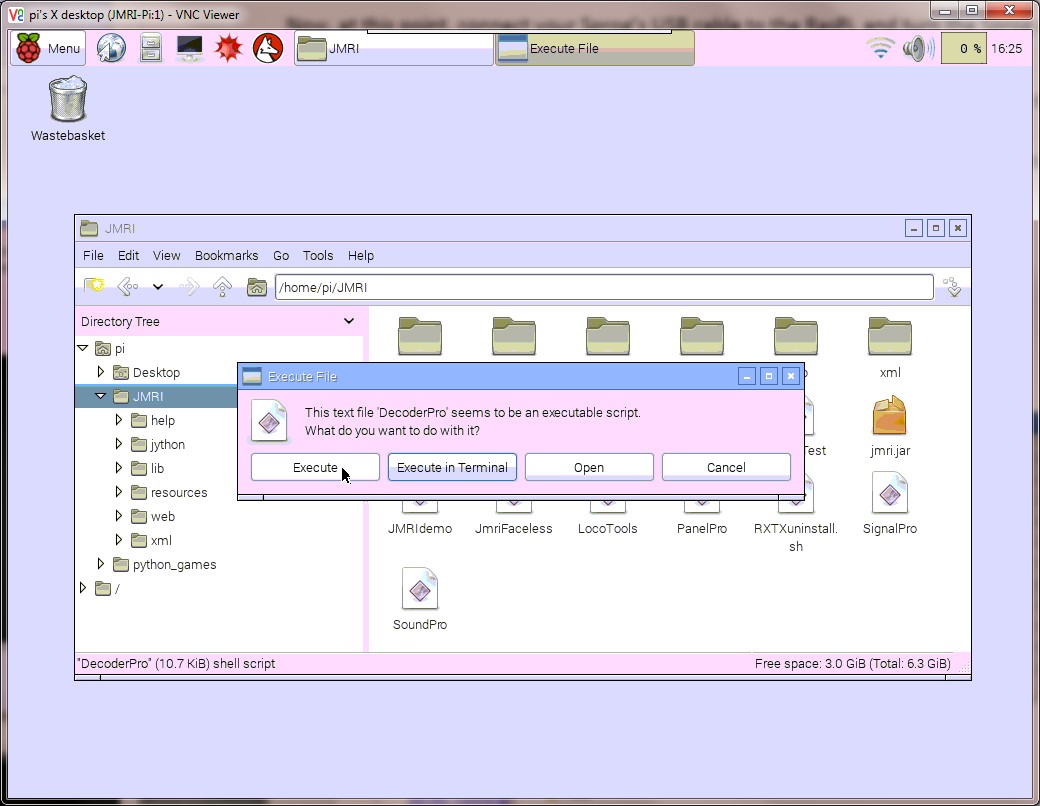
· Close the LXTerminal, and open the File Manager. Navigate to JMRI
Now, at this point, connect your Sprog’s USB cable to the RasPi, and turn the Sprog on.
· In the JMRI directory, locate the file DecoderPro and run it.
· Click Next, confirm both the language and the default owner for the roster files, and click Next.
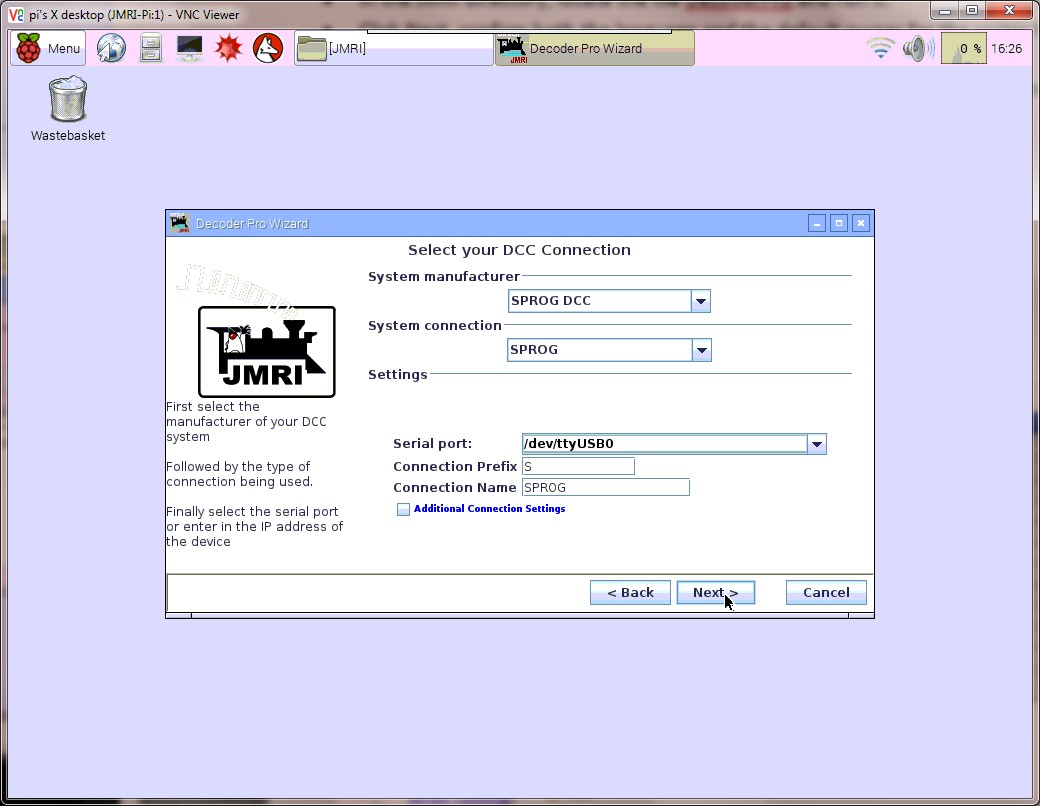
· Select Sprog DCC as the system manufacturer, Sprog as the system connection, and the identified USB port as the serial port. Click Next, and Finish.
· You should now be on the Getting Started screen. Congratulations !
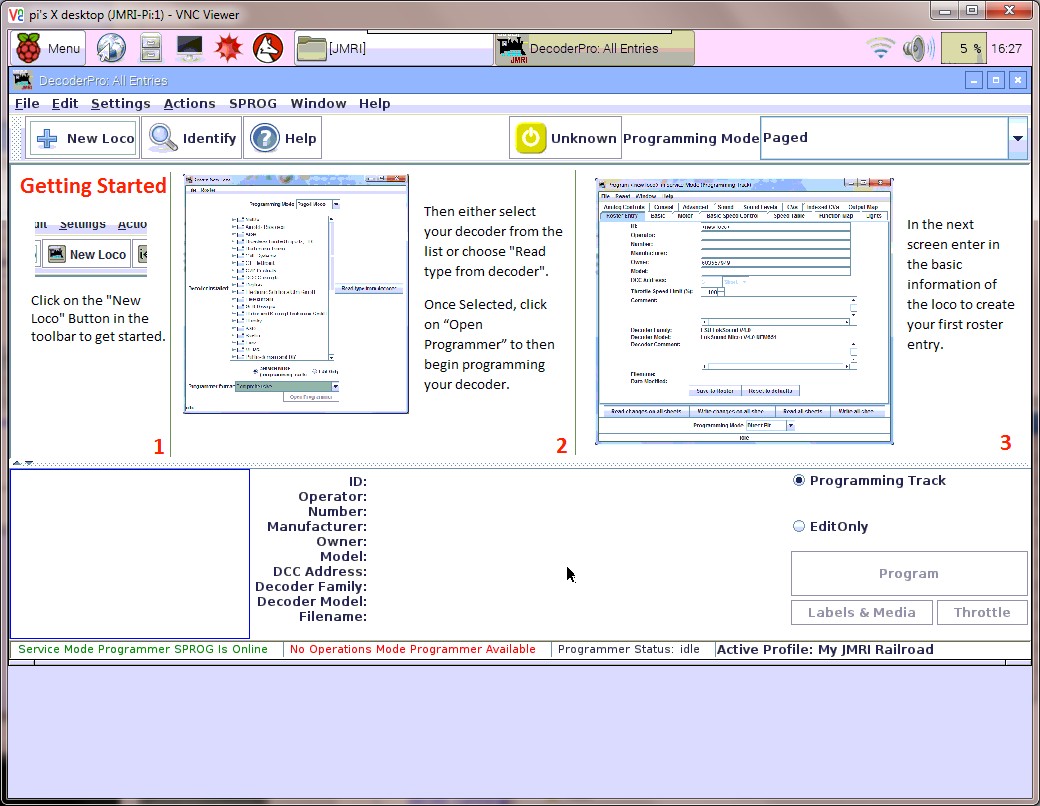
Assuming you have your Sprog connected to a length of track or a rolling road you can now click the Power icon to activate it, put a chipped loco on and click the Identify button. DecoderPro should come back with the identity of the DCC chip, as well as the current settings.
Using a Phone or Tablet as a Throttle
This is all very well … but sometimes you just want to run trains instead of operating a computer ! Never fear, help is at hand with the WiThrottle.
· In DecoderPro, click the Actions menu, and select Start WiThrottle Server
· In the WiThrottle window, you should see (after a few moments) the words “Advertising WiThrottle on “ and the IP address of your RasPi, followed by a port number, for example 10.5.1.50:51314 where 10.5.1.50 is your IP, and 51314 is the port number in use
OK, that’s the throttle advertising done; now to get the Throttle itself for you to use.
· On your tablet or smartphone, browse to your Apps Store and download Engine Driver (on Android / Kindle) or WiThrottle (on Apple iWhatever)
· Run the app, and you should see the RasPi listed in Discovered Servers.
· Click on the server, and you should be taken to the Throttle page.
And that is it ! You have other applications in addition to DecoderPro that you can start up & play along with; please refer to the JMRI documentation for details on how the JMRI apps work.
Running JMRI Headerless
It’s not always convenient to connect up the RasPi to a monitor etc, even via VNC. Sometimes, you just want to turn it on & have it work … This is what is known as ‘headerless’ operation. It’s easy enough …
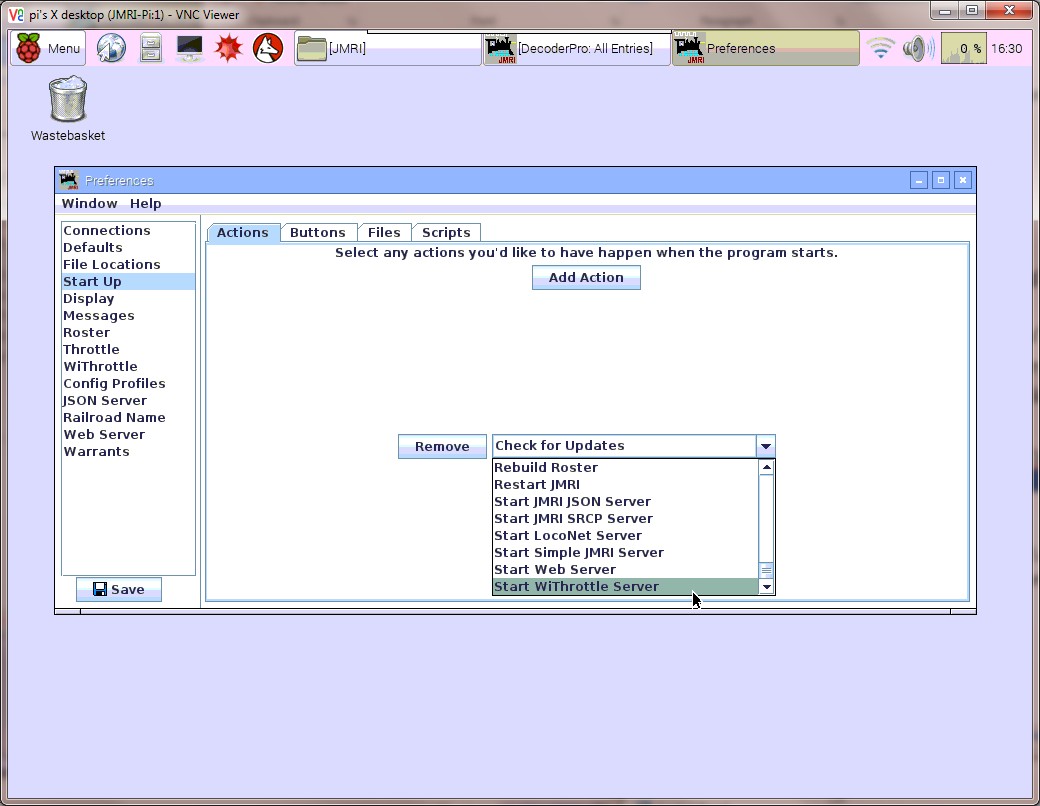
· With DecoderPro running, click the Edit menu and select Preferences
· On the left, select Start Up
· Click the Add Actions button
· On the Actions dropdown, select Start WiThrottle Server
· Click the Save button, and allow the restart of JMRI
· Open LXTerminal, and type “cd .jmri” and press Return
· Type “sudo cp DecoderProConfig2.properties JmriFacelessConfig3.properties” and press Return
· Type “sudo nano /home/pi/.jmri/JmriFacelessConfig3.properties” and press Return
· Find the line with the phrase <entry key=”autoStart”>false</entry>
· Change the false to true, press CTRL-X, Y, and press Return; the file will have saved
· Type “sudo nano /etc/rc.local” and press Return
· Just before the “exit 0”, add the line “sudo –u pi /home/pi/JMRI/JmriFaceless &”
· Now press CTRL-X, Y, and press Return; the file will have saved
To test this … type “sudo shutdown –h now” and the RasPi will close down. Disconnect the power, then the screen and keyboard/mouse. Reconnect the power, and give it a minute or two to start up; then use your phone/tablet to see whether the WiThrottle has started.
Backing up your RasPi
You know those times you suddenly think “I wish I had made a backup !” ? Normally 5 seconds after something seems to have gone disastrously wrong, isn’t it ! Well, if you’ve downloaded the Win 32 Disk Imager (sorry, Mac people, but I’m sure something similar exists for you), you can take a backup copy of your RasPi system quite easily.
· Power the RasPi down, and remove the SD card
· Insert the SD card into your PC, and verify you can open it
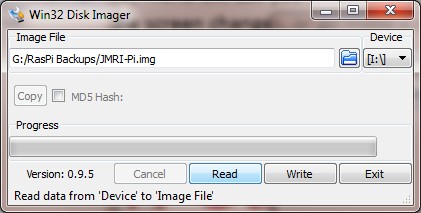
· Run the Win 32 Disk Imager program
· In the top-right corner, select the drive letter the SD card is using (in the screenshot, it’s listed as I: )
· Click the folder icon next to this, and browse to the location you wish to save the image file to
· Type the name you want to use for the backup file, and make sure you add “.img” on the end
· Click the Read icon, and off it goes ! Simple.
Just remember to make a new backup when you make substantial changes.
Useful Links
JMRI - http://jmri.sourceforge.net/
- http://groups.yahoo.com/group/jmriusers/
Raspberry Pi - https://www.raspberrypi.org/
Sprog - http://www.sprog-dcc.co.uk/
SD Formatter - https://www.sdcard.org/downloads/formatter_4/
Win 32 Disk Imager - http://sourceforge.net/projects/win32diskimager/
Putty - http://www.chiark.greenend.org.uk/~sgtatham/putty/download.html
TightVNC - http://www.tightvnc.com/